# Table of Contents
# URI
URI(Uniform Resource Identifier, 통합 자원 식별자)는 자원을 구분해주는 식별자입니다. 내 스마트폰이나 데스크톱에는 많은 자원(파일, 이미지, 비디오 등)이 존재합니다. 또한 연결된 인터넷 상에도 많은 자원이 존재합니다. URI는 이 자원을 구분하고 식별하는데 사용됩니다.
우리는 구글에 접속할 때 웹 브라우저의 주소창에 http://www.google.com를 입력합니다. 이때 http://www.google.com 뒤에는 index.html이 생략되어있습니다
http://www.google.com/index.html
이 주소도 URI입니다. 웹 브라우저는 URI에 위치한 index.html 파일을 가져와서 화면에 보여줍니다. 이처럼 URI는 자원을 구분하고 식별하는데 사용됩니다.
# URI 구조
URI는 다음과 같은 구조를 가지고 있습니다.
scheme:[//[user[:password]@]host[:port]][/path][?query]
scheme와 host는 필수사항이고 나머지는 선택사항입니다.
// 예시
https://www.google.com/index.html
mailto:yologger@gmail.com
tel:+82-10-1111-2222
ftp://yologger:1234@192.168.0.1:21
content://com.korea.trains/line/1
file:///usr/local/bin/
data:text/vnd-example+xyz;foo=bar;base64,R0lGODdh
news:comp.infosystems.www.servers.unix
telnet://192.0.2.16:80/
# Scheme
scheme은 어떤 프로토콜을 사용할지 지정합니다. 자주 쓰는 스킴에는 http, https, ftp, content, file, data가 있습니다. 모든 URI 스킴은 이 곳 (opens new window)에서 확인할 수 있습니다.
# Host
네트워크에 연결되어 있는 모든 컴퓨터 각각을 호스트라고 합니다. 보통 도메인 네임이나 IP 주소을 사용하여 호스트를 구분하고 식별합니다.
// 도메인 네임
http://www.netflix.com
https://www.google.com

// IP 주소
https://172.217.27.78
# Port
컴퓨터 내에서 실행되고있는 어플리케이션들을 구분하기 위해 사용하는 번호입니다. 보통 HTTP 프로토콜을 사용할 때는 80, HTTPS 프로토콜을 사용할 때는 443 포트를 사용합니다. 예제는 다음과 같습니다.
http://www.netflix.com:80
https://www.google.com:443
# Authority
authority는 사용자 이름과 비밀번호, 호스트, 포트번호의 조합입니다.
authority = [ username ":" password "@" ] host [ ":" port ]
yologger:1234@mail.google.com/:587
# Path
요청할 자원에 대한 경로를 의미합니다.
// 사람 자원의 경로
https://www.example.com/person

// 사람 중 프로그래머 자원의 경로
https://www.example.com/person/programmer

// 차량 자원의 경로
https://www.example.com/car

// 책 자원의 경로
https://192.168.0.1/book
# Query
경로에 있는 자원의 범위를 한정하기 위해 사용합니다.
// 이름이 paul인 사람
https://www.example.com/person?name=paul

// 국가가 england인 사람
https://www.example.com/person?nation=england

// 이름이 john이고 국가가 america인 사람
https://www.example.com/person?name=john&nation=america

// 제조업체가 benz인 자동차
https://www.example.com/car?manufacturer=benz

// 저자가 paul인 책
https://192.168.0.1/book?author=paul

// 저자가 john인 책
https://192.168.0.1/book?author=john
# 안드로이드에서의 URI
안드로이드 API는 URI를 취급하기 위해 Uri클래스를 제공합니다. Uri클래스는 암시적 인텐트, 컨텐트 프로바이더 등 안드로이드의 다양한 분야에서 많이 사용됩니다.
Uri.Builder클래스의 build()메소드를 사용하여 Uri객체를 생성할 수 있습니다.
import android.net.Uri

val uri: Uri = Uri.Builder()
    .scheme("https")
    .authority("www.example.com")
    .appendPath("person")
    .appendPath("programmer")
    .appendQueryParameter("name", "paul")
    .appendQueryParameter("nation", "england")
    .build()

println(uri.toString())
// https://www.example.com/person/programmer?name=paul&nation=england
Uri클래스의 parse()메소드를 사용할 수도 있습니다.
import android.net.Uri

var uri = Uri.parse("https://www.example.com/person/programmer?name=paul&nation=england")

println(uri.toString())
// https://www.example.com/person/programmer?name=paul&nation=england
# UriMatcher
UriMatcher클래스는 두 개의 Uri를 비교하여 사용자가 정의한 값을 반환하는데 사용합니다. UriMatcher클래스는 두 개의 메소드만을 가지고 있습니다.
# addUri()
기준이 되는 Uri를 등록하는데 사용합니다.
addUri([authority], [path], [code])
세 번째 인자인 code는 두 Uri가 일치할 때 반환되는 정수값입니다.
UriMatcher객체를 생성하고 세 개의 Uri를 등록해봅시다.
val uriMatcher = UriMatcher(UriMatcher.NO_MATCH)

uriMatcher.addURI("www.example.com", "person", 1)
uriMatcher.addURI("www.example.com", "person/*", 2)
uriMatcher.addURI("www.example.com", "car/*", 3)
# match()
인자로 전달된 Uri와 위에서 등록한 Uri과 비교하여 정수값을 반환합니다.
우선 네 개의 Uri를 생성합시다.
// https://www.example.com/person
val uri1 = Uri.Builder()
    .scheme("https")
    .authority("www.example.com")
    .appendPath("person")
    .build()

// https://www.example.com/person/programmer
val uri2 = Uri.Builder()
    .scheme("https")
    .authority("www.example.com")
    .appendPath("person")
    .appendPath("programmer")
    .build()

// https://www.example.com/car/convertible
val uri3 = Uri.Builder()
    .scheme("https")
    .authority("www.example.com")
    .appendPath("car")
    .appendPath("convertible")
    .build()

// https://www.test.com/book
val uri4 = Uri.Builder()
    .scheme("https")
    .authority("www.test.com")
    .appendPath("book")
    .build()
이제 다음과 같이 두 Uri를 비교할 수 있습니다.
val result1 = uriMatcher.match(uri1)    // 1

val result2 = uriMatcher.match(uri2)    // 2

val result3 = uriMatcher.match(uri3)    // 3

// 일치하는 uri가 없으면 -1을 반환합니다.
val result4 = uriMatcher.match(uri4)    // -1
# 암시적 인텐트
암시적 인텐트는 수행할 액션, 실행할 액티비티에 의해 처리되는 데이터, 데이터 타입을 지정하여 다른 앱의 액티비티를 실행시킵니다. 실행할 액티비티에 의해 처리되는 데이터 및 데이터 타입은 Uri 클래스를 사용하여 정의합니다.
# 전화 앱 예제
전화 앱 예제를 통해 암시적 인텐트에 대해 알아보겠습니다.
우선 전화번호 데이터를 처리할 수 있는 앱을 실행해보겠습니다. 아래 코드를 살펴봅시다.
val intent = Intent()

// 액션 설정
intent.action = Intent.ACTION_DIAL

// 수신 액티비티에 의해 처리될 데이터 설정
intent.data = Uri.parse("tel:02-111-1111")

// 액티비티 실행
startActivity(intent)
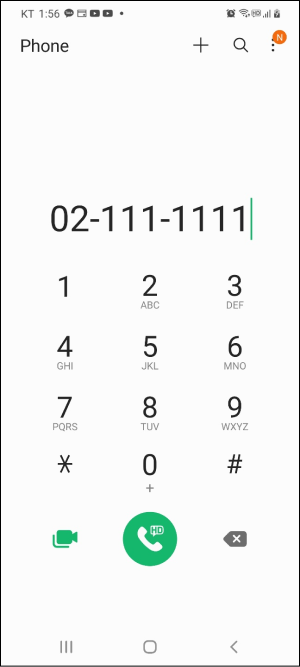
Intent.ACTION_DIAL가 액션이고 Uri.parse("tel:02-111-1111")가 실행할 액티비티에 의해 처리되는 데이터 및 데이터의 타입입니다. 안드로이드 시스템은 설치된 앱을 살펴보고 Intent.ACTION_DIAL액션과 tel:02-111-1111데이터를 처리할 수 있는 앱을 실행합니다.
위 구문은 아래와 같이 단축할 수 있습니다.
val intent = Intent(Intent.ACTION_DIAL, Uri.parse("tel:02-111-1111"))
startActivity(intent)
전화 앱은 Intent.ACTION_DIAL액션과 Uri데이터을 처리할 수 있는 앱입니다.

따라서 다음과 같이 전화 앱이 실행되고, 데이터가 처리되어 화면에 출력됩니다.
# 웹 브라우저 앱 예제
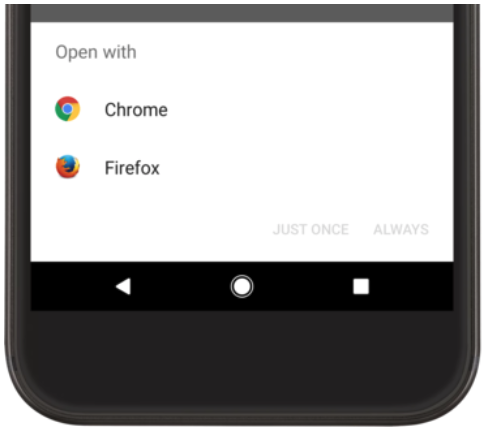
예제를 하나 더 살펴봅시다. 웹 브라우저를 실행시키는 암시적 인텐트 예제입니다. Intent.ACTION_VIEW가 액션이고 Uri.parse("http://www.google.com")가 실행할 액티비티에 의해 처리되는 데이터 및 데이터 타입입니다.
val intent = Intent(Intent.ACTION_VIEW, Uri.parse("http://www.google.com"))
startActivity(intent)
이제 앱을 실행하면 다음과 같은 대화상자가 나옵니다. 액션과 데이터를 처리할 수 있는 앱이 2개 이상인 경우 다음과 같이 대화상자가 나오게 됩니다.
인텐트를 처리할 수 있는 앱이 없는 경우 안드로이드 시스템은 ActivityNotFoundException을 발생시킵니다. 따라서 다음과 같이 예외 처리를 할 수 있습니다.
try {
    startActivity(intent)
} catch (e: ActivityNotFoundException) {
    // 예외 처리
}
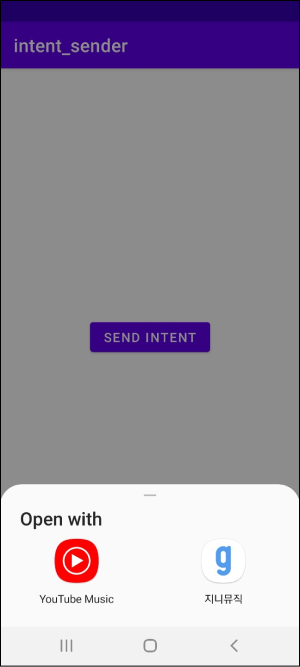
# 오디오 플레이어 앱 예제
버튼을 누르면 오디오 플레이어 앱을 실행하는 예제입니다.
안드로이드 시스템에는 현재 두 개의 오디오 플레이어 앱이 설치되어 있습니다.
Intent.createChooser()메소드를 사용하면 오디오 플레이어를 처리할 수 있는 앱이 여러 개일 때 선택할 수 있는 대화상자를 표시할 수 있습니다.
class MainActivity : AppCompatActivity() {

    val button: Button by lazy { findViewById<Button>(R.id.button) }

    override fun onCreate(savedInstanceState: Bundle?) {
        super.onCreate(savedInstanceState)
        setContentView(R.layout.activity_main)

        button.setOnClickListener {

            var intent = Intent(Intent.ACTION_VIEW)
            var uri = Uri.parse("content:///sdcard/Download/music.mp3")
            intent.setDataAndType(uri, "audio/mp3")

            // Chooser 생성
            val chooser = Intent.createChooser(intent, "Open with")

            startActivity(chooser)
        }
    }
}
이제 버튼을 누르면 다음과 같이 대화창이 나옵니다.
# 인텐트 필터
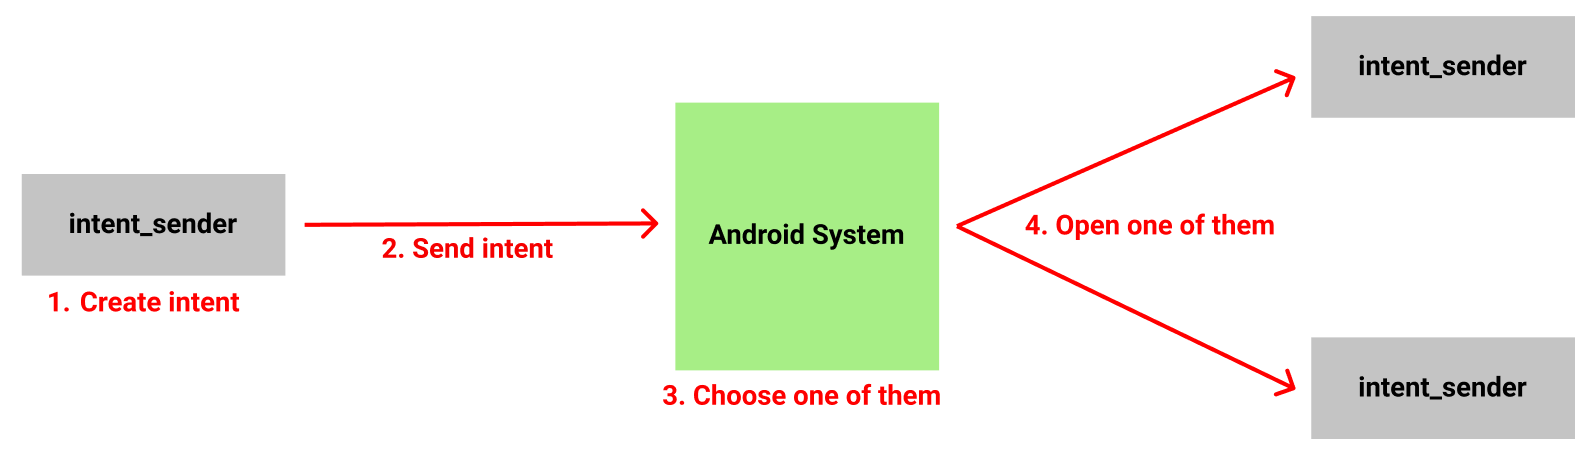
우리는 이전 포스트에서 음악 플레이어 앱을 실행하기 위해 암시적 인텐트를 전송했습니다. 그렇다면 음악 플레이어 앱에서는 암시적 인텐트가 자신과 관련되었는지 어떻게 식별할까요? 이는 음악 플레이어 앱 안에 인텐트 필터(Intent Filter)가 정의되어있기 때문입니다.
예제를 통해 인텐트 필터에 대해 알아보겠습니다. 우리는 세 개의 앱을 만들 것입니다.
- intent_sender
- intent_receiver
- intent_acceptor
intent_sender는 암시적 인텐트를 생성하여 안드로이드 시스템에 발송합니다. intent_receiver와 intent_acceptor에는 인텐트 필터를 등록합니다.
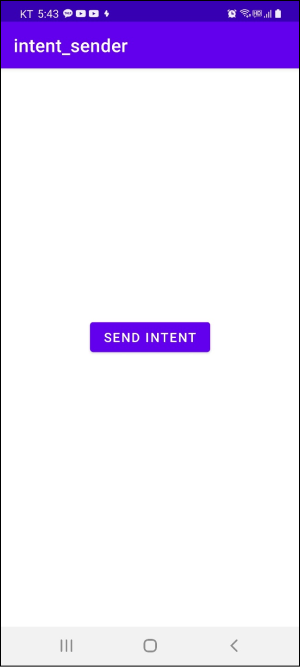
# intent_sender
우선 intent_sender라는 프로젝트를 생성합시다. 이 프로젝트는 버튼을 클릭하면 인텐트를 생성하여 안드로이드 시스템에 전달합니다. 레이아웃 코드는 다음과 같습니다.
<?xml version="1.0" encoding="utf-8"?>
<androidx.constraintlayout.widget.ConstraintLayout xmlns:android="http://schemas.android.com/apk/res/android"
    xmlns:app="http://schemas.android.com/apk/res-auto"
    xmlns:tools="http://schemas.android.com/tools"
    android:layout_width="match_parent"
    android:layout_height="match_parent"
    tools:context=".MainActivity">

    <Button
        android:id="@+id/button"
        android:layout_width="wrap_content"
        android:layout_height="wrap_content"
        android:text="Send Intent"
        app:layout_constraintBottom_toBottomOf="parent"
        app:layout_constraintEnd_toEndOf="parent"
        app:layout_constraintStart_toStartOf="parent"
        app:layout_constraintTop_toTopOf="parent"
        app:layout_constraintVertical_bias="0.48" />

</androidx.constraintlayout.widget.ConstraintLayout>
화면은 다음과 같습니다.

class MainActivity : AppCompatActivity() {
    val button: Button by lazy { findViewById<Button>(R.id.button) }

    override fun onCreate(savedInstanceState: Bundle?) {
        super.onCreate(savedInstanceState)
        setContentView(R.layout.activity_main)

        button.setOnClickListener {
            // 인텐트 생성
            var intent = Intent()
            // 액션 추가
            intent.action = "my_action"
            // 액티비티 시작
            startActivity(intent)
        }
    }
}
# intent_receiver
intent_receiver라는 프로젝트를 생성합시다. 이 앱에 IntentReceiverActivity액티비티를 생성하고 레이아웃을 다음과 같이 구성합니다.
<?xml version="1.0" encoding="utf-8"?>
<androidx.constraintlayout.widget.ConstraintLayout xmlns:android="http://schemas.android.com/apk/res/android"
    xmlns:app="http://schemas.android.com/apk/res-auto"
    xmlns:tools="http://schemas.android.com/tools"
    android:layout_width="match_parent"
    android:layout_height="match_parent"
    tools:context=".IntentReceiverActivity">

    <TextView
        android:id="@+id/textView"
        android:layout_width="wrap_content"
        android:layout_height="wrap_content"
        android:text="Intent Receiver Activity"
        app:layout_constraintBottom_toBottomOf="parent"
        app:layout_constraintEnd_toEndOf="parent"
        app:layout_constraintStart_toStartOf="parent"
        app:layout_constraintTop_toTopOf="parent" />

</androidx.constraintlayout.widget.ConstraintLayout>
화면은 다음과 같습니다.

intent_receiver프로젝트의 AndroidManifest.xml에 다음과 같이 인텐트 필터를 등록합니다.
<?xml version="1.0" encoding="utf-8"?>
<manifest xmlns:android="http://schemas.android.com/apk/res/android"
    package="com.yologger.intent_receiver">

    <application
        android:allowBackup="true"
        android:icon="@mipmap/ic_launcher"
        android:label="@string/app_name"
        android:roundIcon="@mipmap/ic_launcher_round"
        android:supportsRtl="true"
        android:theme="@style/Theme.Intent_receiver">
        <activity android:name=".IntentReceiverActivity">
            <intent-filter>
                <action android:name="my_action" />
                <category android:name="android.intent.category.DEFAULT" />
            </intent-filter>
        </activity>
        <activity android:name=".MainActivity">
            <!-- ... -->
        </activity>
    </application>

</manifest>
인텐트 필터를 등록할 때는 <intent-filter>태그를 사용합니다. 그 안에 <action>태그를 사용해서 액션을 등록합니다. <category>태그는 카테고리라고 하는데 뒤에서 다시 설명하겠습니다.
# intent_acceptor
intent_acceptor라는 프로젝트를 생성합시다. 이 앱에 IntentAcceptorActivity액티비티를 생성하고 레이아웃을 다음과 같이 구성합니다.
<?xml version="1.0" encoding="utf-8"?>
<androidx.constraintlayout.widget.ConstraintLayout xmlns:android="http://schemas.android.com/apk/res/android"
    xmlns:app="http://schemas.android.com/apk/res-auto"
    xmlns:tools="http://schemas.android.com/tools"
    android:layout_width="match_parent"
    android:layout_height="match_parent"
    tools:context=".IntentAcceptorActivity">

    <TextView
        android:id="@+id/textView"
        android:layout_width="wrap_content"
        android:layout_height="wrap_content"
        android:text="Intent Acceptor Activity"
        app:layout_constraintBottom_toBottomOf="parent"
        app:layout_constraintEnd_toEndOf="parent"
        app:layout_constraintStart_toStartOf="parent"
        app:layout_constraintTop_toTopOf="parent" />

</androidx.constraintlayout.widget.ConstraintLayout>
화면은 다음과 같습니다.

intent_acceptor프로젝트의 AndroidManifest.xml에 다음과 같이 인텐트 필터를 등록합니다.
<?xml version="1.0" encoding="utf-8"?>
<manifest xmlns:android="http://schemas.android.com/apk/res/android"
    package="com.yologger.intent_accepter">

    <application
        android:allowBackup="true"
        android:icon="@mipmap/ic_launcher"
        android:label="@string/app_name"
        android:roundIcon="@mipmap/ic_launcher_round"
        android:supportsRtl="true"
        android:theme="@style/Theme.Intent_accepter">
        <activity android:name=".IntentAcceptorActivity">
            <intent-filter>
                <action android:name="my_action" />
                <category android:name="android.intent.category.DEFAULT" />
            </intent-filter>
        </activity>
        <activity android:name=".MainActivity">
            <!-- ... -->
        </activity>
    </application>

</manifest>
# 암시적 인텐트 보내기
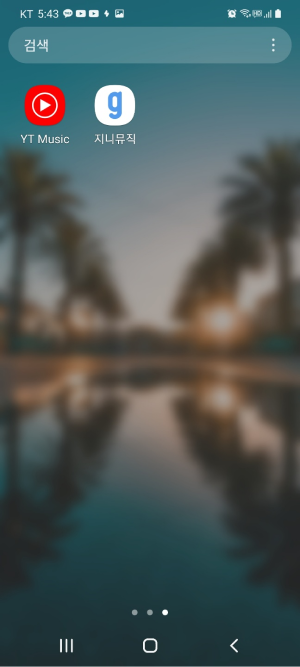
이제 세 개의 앱을 안드로이드 시스템에 설치합니다. 그리고 intent_sender 앱을 실행합니다.
이제 버튼을 클릭하면 다음과 같이 my_action을 처리할 수 있는 앱을 보여줍니다.
# 카테고리
우리는 암시적 인텐트를 식별하기 위해 인텐트 필터에 액션을 등록했습니다.
<intent-filter>
    <action android:name="my_action" />
    <category android:name="android.intent.category.DEFAULT" />
</intent-filter>
그렇다면 카테고리는 무엇일까요? 카테고리(Category)는 인텐트를 더욱 정교하게 필터링하고 식별하는데 사용합니다. 예제로 돌아와봅시다.
우선 intent_sender 프로젝트에서 인텐트에 카테고리를 추가합니다. 카테고리를 추가할 때는 addCategory()메소드를 사용합니다.
class MainActivity : AppCompatActivity() {
    val button: Button by lazy { findViewById<Button>(R.id.button) }

    override fun onCreate(savedInstanceState: Bundle?) {
        super.onCreate(savedInstanceState)
        setContentView(R.layout.activity_main)

        button.setOnClickListener {
            var intent = Intent()
            intent.action = "my_action"
            // 카테고리 추가
            intent.addCategory("my_category")
            startActivity(intent)
        }
    }
}
intent_receiver의 AndroidManifest.xml에 카테고리를 추가합니다. intent_acceptor 프로젝트에는 카테고리를 추가하지 않습니다.
<?xml version="1.0" encoding="utf-8"?>
<manifest xmlns:android="http://schemas.android.com/apk/res/android"
    package="com.yologger.intent_receiver">

    <application
        android:allowBackup="true"
        android:icon="@mipmap/ic_launcher"
        android:label="@string/app_name"
        android:roundIcon="@mipmap/ic_launcher_round"
        android:supportsRtl="true"
        android:theme="@style/Theme.Intent_receiver">
        <activity android:name=".IntentReceiverActivity">
            <intent-filter>
                <action android:name="custom_action"/>
                <category android:name="android.intent.category.DEFAULT"/>
                <!-- 카테고리 추가 -->
                <category android:name="my_category" />
            </intent-filter>
        </activity>
        <activity android:name=".MainActivity">
            <!-- ... -->
        </activity>
    </application>

</manifest>
이제 intent_sender를 실행하고 버튼을 누르면 intent_receiver 앱만 실행됩니다. 이처럼 카테고리는 인텐트를 더욱 정교하게 필터링하고 식별하는데 사용할 수 있습니다.
# android.intent.category.DEFAULT
암시적 인텐트를 생성할 때 카테고리를 추가하지 않아도 자동으로 android.intent.category.DEFAULT 카테고리가 추가됩니다. 따라서 인텐트 필터에서 반드시 <category android:name="android.intent.category.DEFAULT"/>를 추가해야합니다.
# android.intent.action.Main
안드로이드 스튜디오에서 프로젝트를 생성하면 MainActivity.kt가 기본으로 생성됩니다. 이 액티비티의 인텐트 필터도 다음과 같이 자동으로 생성됩니다.
<?xml version="1.0" encoding="utf-8"?>
<manifest xmlns:android="http://schemas.android.com/apk/res/android"
    package="com.yologger.intent_receiver">

    <application
        android:allowBackup="true"
        android:icon="@mipmap/ic_launcher"
        android:label="@string/app_name"
        android:roundIcon="@mipmap/ic_launcher_round"
        android:supportsRtl="true"
        android:theme="@style/Theme.Intent_receiver">
        <activity android:name=".MainActivity">
            <intent-filter>
                <action android:name="android.intent.action.MAIN" />
                <category android:name="android.intent.category.LAUNCHER" />
            </intent-filter>
        </activity>
    </application>

</manifest>
android.intent.action.MAIN 액션과 android.intent.category.LAUNCHER 카테고리는 앱을 실행했을 때 처음 실행할 액티비티를 지정하는데 사용됩니다. 앱 아이콘을 클릭하여 앱을 실행하면 안드로이드 시스템이 android.intent.action.MAIN 액션과 android.intent.category.LAUNCHER 카테고리가 등록된 액티비티를 실행합니다. 만약 위의 액션과 카테고리를 등록한 액티비티가 없다면 오류가 발생합니다.